Carburettor rebuild
A couple of people on the JustKampers forum asked for some instructions with pic’s to do a VW carb strip down and rebuild, so Issy and Allanh here you go.
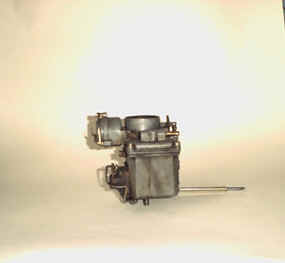
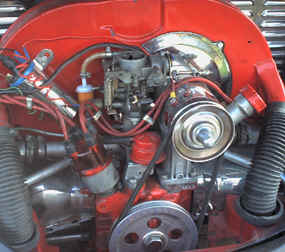
I have used a standard VW solex 31/34 pict 3 carb for the pic’s but most of the standard VW carbs are similar in appearance and function even the twin carbs on the VW type 3 engine, they are just a bit smaller and you got 2 of them.
Ok a couple of pic’s to get you orientated, the views are as if you were looking at the carb in the engine bay.
Right to get you started give the outside of the carb a very good clean with carbcleaner or petrol and an old toothbrush to get all the crap off. With the “square” side of the carb facing you and the choke at the back (tubey bit jc ) on the right of the carb is a round sticking out bit that’s the fuel shut off valve it should click when you apply 12v to it.
On the left of the carb at the top is a flat round housing held on with 3 screws that’s your auto choke that opens the top butterfly of the carb again if you apply 12v to it should move the butterfly or at least if the butterfly is stuck it should get warm. Under this is a square housing with a lever attached that’s the accelerator pump. ok!! I am assuming you have a 34 pict 3 if you have a different one it doesn’t matter just some of the bits are in a different place . You can check the auto choke and shut off valve in the bus by switching on the ignition (but not starting the engine) the shut off valve should “click” if it is working ok.
With the air cleaner removed you should see the choke butterfly open after a few minutes, if the butterfly is stuck the housing of the auto choke should get warm. On the bench you can check them with a 12v supply (spare battery) and a couple lengths of wire with crocodile clips each end. Connect one wire to the battery negative and the carb body and the other wire to the battery positive and then to the auto choke and the shut off valve in turn to check if they function properly. (the foregoing bench test bit courtesy of SKORPIO on the forum, cheers mate).
 If the fuel shut off valve is not working you will need to buy a new one as you cant fix it, just unscrew the old one and screw in the new one, its the same with the auto choke I am afraid if it is not working, undo the 3 screws in the clamp ring and remove the auto choke body (this can be a bit stiff, if so gently grip the body with a pair of pump pliers and pull it off). In the pic to the right you can see the disassembled auto choke. To refit your new one carefully fit the hook on the end of the bimetal spring to the lever pin in the carb body and push the two together, if you look at the two bodies on the choke element is a line and on the carb body are three moulded “pips” line up the line on the body between the first two “pips”.
Right get yourself a nice clean area to work once the carb is clean and you have emptied the petrol out of it. I cover my bench with a piece of that lining wall paper stuff as its a dull white colour and I can see the bits I drop easier ( its me age the eyes are going )
Look down on the top of carb and you will see 5 screws remove them this will separate the carb into 2 bits it may take a bit of a tug.
Turn the top bit over and you will see a brass bit about 13mm across the flats this is the needle valve that stops the carb overfilling undo it and give it a blow thro then refit, if you have got a rebuild kit there should be a new valve assembly in it, so fit the new one and its washer.
Now pick up your bottom half you should see a black or white plastic float held in with a plastic clip lift the float and it should come out with the clip if not give a helping hand with a small screwdriver careful you don’t drop the loose spindle for the float. There is probably a lot of crap in the bottom of the float chamber so give it a good clean out.
 On the right hand side at the bottom of the chamber is a brass bolt head remove it then poke a good screwdriver thro the hole and undo the main jet and remove, make sure it isn’t blocked and put to one side now. To the right you should see a large and a small brass screws, one above the other they are your mixture screws or air bypass and idle mixture screws if you want to be posh (they are inside the tunnel bits) right mark the casing with a sharp instrument alongside the screw slot as a reference (in the pic I have used some red paint so they stand out a bit better) Now get pen and paper and count how many turns and parts there of it takes until they both bottom into the casting GENTLY does it and make a note of it i.e. 3and 1/2 turns now screw them both out all the way and check that the tapers are ok and that they both have rubber “O” rings on them, then put to one side
 Look toward the back of the carb and between the float chamber and the choke tube you should see what looks likes a brass headed screw nearly flush with the casting remove it it should have a tube with a lot of little holes in it attached (Air correction jet and emulsion tube) again make sure it isn’t blocked then put to one side now to the left of the choke tube should be a bent over tube bit (u shaped, this be your pump jet) that’s the bit that squirts the petrol from the accelerator pump, gently give it a slight twist and pull and it should come out again clean it and put to one side.
 On the left of the carb is a square bit held on by 4 screws with a lever attached (accelerator pump) undo said screws carefully and remove leave attached to lever bit note the orientation of the rubber diaphragm and don’t loose the spring that’s your accelerator pump in bits ooops!!!! Above and to the left you should see 2 more brass screw’s or small brass bolts, these are your pilot jet and auxiliary jet remove and give them a clean.
You should now have a collection of bits like this.
Right time to clean all your little holes if you have an air line use that if not use carb cleaner or a can of WD40 type stuff start at the top where you removed the pump jet and the tube with holes (air jet and emulsion tube) between these 2 are a couple of other drilled holes give them all a dose of air or your can of cleaner, clean the stuff from the float chamber and the pump body then do the mixture screw holes and the drillings inside the pump body and the main jet hole in the bottom of the float chamber . Now check the rubber diaphragm for tears etc and just looking grotty but really you should replace this bit if you have a rebuild kit a new one is in there for you.
Reassemble the pump making sure the broad face of the spring is inwards. Put the new “o” rings on the mixture screws and screw them right in and then out the required amount as per your earlier notes I always give the “O” rings a very faint smear of silicone grease as I think it helps them seal better. Refit your “U” bend or if your lucky and a new one was in your kit replace it (I haven’t had a new one since the late 70’s tho) replace your air correction jet (holey tube jc ) then refit the main jet into the bottom of the float chamber then its plug with a new washer if you have one. Refit your float with its shaft and clip. Sort out the new gasket from the 4 or 5 supplied with the kit make sure none of the holes in the carb are covered especially the little holes between the air correction jet and your “U” bend. Then replace the top of your carb. now make sure you don’t have any bits left if you have it means I have forgotten something ooops!!!!!!!
 Now refit your carb to the engine, Make sure you reconnect the feed wires to the fuel shut off valve and the auto choke. Also fit a fuel filter between the pump and your carb, that will hopefully save you having to strip the carb down to often. Now crank your engine over a couple of times and it should fire up and run reasonably well, Let it idle for awhile until it warms up and check that the auto choke is working properly, If all is ok turn it off and go have a cup of tea. Your carb may need to be adjusted if it is running a bit rich or lean there is a description in most manuals telling you how to do it but if you get stuck drop us an email and I will put a description up on here, Don’t forget you must make sure that the tappets and timing are set correctly BEFORE you try to set up the carb.
there you go a brief description on how to strip and clean a carb any questions …..no then class is dismissed 🙂
Original location:
http://www.colinwebb.pwp.blueyonder.co.uk/carb.html
This web page was posted at the link above but the website is no longer online and I was unable to track the owner down. I felt this web page was too good to disappear.
Learn more about my Revival project, any questions let me know.