Overhead light install
This how to is for fitting the W8 overhead light from a Passat W8 to your MKIV. The guide here is for non sunroof cars, but the general principals apply too all models.
The console part number will be different of course if you have a beige interior or a sunroof. This method allows you to fit the unit WITHOUT cutting the wiring harness by using an adapter.
The pictures in this how to were kindly supplied by Foxy, who’s excellent site can be found here.
Tools
-
- Philips and Flat head Screwdrivers
- Wire Cutters
- W8 Interior light w/o Sunroof Parts List:
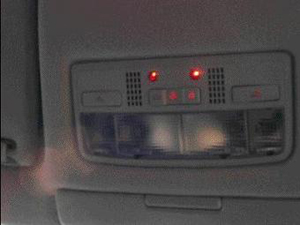
- (1) 3B7 947 105 F 2EN : Grey dome light
- (1) 3B0-972-706 Dome light plug
- (2) 000-979-131 Wires / connectors (for w8 dome light)
- (2) 000-979-103 wires / connectors (for existing harness)
- (1) 893-971-993 Connector (mates with harness)
- (1) 10ft wire length for connection to the lights dial
You cut the wires supplied in half to have double the amount (they are very long so do this).
1) Building The Adapter
You have two types of wires, which we will call SE and GE wires – that is, silver ended wires and gold ended wires. You have two of each but need four, so cut all of your wires in half. Now you have 4 of each, trim them down a bit as they are all too long – so you have 8 wires in total, 4 with a silver plug and 4 with a gold plug, all about 6-8 inches long (just to make sure you have enough slack in the wires for installation).
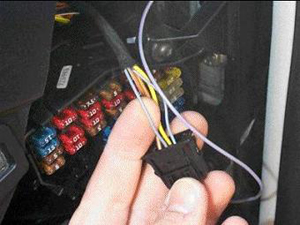
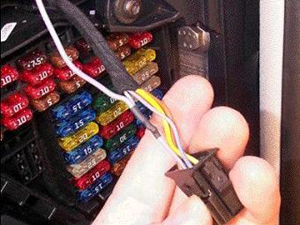
Insert the four SE wires into positions 1, 3, 4, and 5 on the flat, rectangular plug. Insert three of the GE wires into the three positions on the block like plug. If you look at both plugs the cover prises up, do this gently and click the wires into place (no click means its not in properly). Once all the wires are inserted you need to connect the SE wires to the GE wires and long wire as follows:
-
- Position #1 connect via your long wire to the blue/grey wire at the dash light intensity rheostat
- Position #3 connect to the GE wire in pin 1 on the plug that goes to the existing harness
- Position #4 connect to the GE wire in pin 3 on the plug that goes to the existing harness
- Position #5 connect to the GE wire in pin 2 on the plug that goes to the existing harness
You can connect these wires using a soldering iron, but I have found insulation tape works just fine too. You will now have an adapter, with 3 wires going between two black plugs and a long wire hanging off it. Plug this into your W8 light, its going in the car.
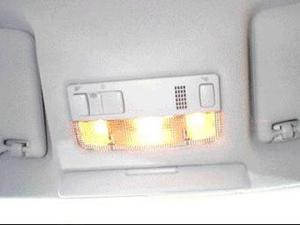
2) Removing The Existing Unit and Fitting the W8
Once you have built this adapter the process is relatively simple. Remove the clear cover and undo the two screws with a screwdriver.
The light will now pull out of the recess in the roof when you apply pressure to the tabs on either side. Unplug the unit from the car and throw away – you won’t be needing it anymore.
Take the W8 light with its new harness plugged in and connect it up to the car. Bare in mind you are going to tuck in the long wire and hide it around the trim, along the roof and down the A pillar to the side of the dashboard where it will be joined to the light control dial. When you push the W8 mod into place you will notice that it has no screws; the lining is tight enough to hold it in place.
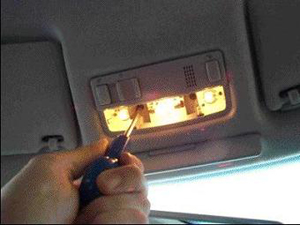
If you have trouble clipping the light into place, you may find its because the leading edge (closest to the windscreen) keeps popping back out. Mine did on both the cars I have had where I have done this modification. To rectify it, take a pair of pliers and bend the two clips on the edge ever so slightly – so the are flatter and don’t stick out as far. DO NOT bend too much though, as it will just fall out of the roof.
3) Wiring To The Lights Dial
Once the W8 light is installed, feed the wire down to the side of the dash. Some guides recommend the removal of all trim but from experience, it never goes back on as I would like, so when I can I avoid removing anything! If you remove the little flap behind the mirror (one screw) you can pull the roof lining away from the roof enough to feed the wire through. Then tuck it under the leading edge of the roof lining all the way round the windscreen and down to the dash.
Prise off the panel on the side of the dash GENTLY using a screwdriver so you can access the electronics as above. You can now squeeze the wire through the gap between A pillar and dash and get it right to the light rheostat unseen. I tap into the blue/grey wire which is permanent power; join the long length from the W8 to it. Its best if you solder to do the job but you can also do it by stripping back the wire, connecting it and then insulating the join. Now is a good time to test everything is working before you put the dash panel back on.
Check that:
-
- Make sure the LEDs are lit when the lights are on
- Test the individual reading light buttons and door action
- I also like to smell for burning….
Original location:
http://www.borabase.com/w8.htm
This web page was posted at the link above but the website is no longer online and I was unable to track the owner down. I felt this web page was too good to disappear.
Learn more about my Revival project, any questions let me know.