VW Passat Comfort Control Module harness repair
If you own a VW Passat, and also have some funky things happening with your electronics you probably have something wrong with your Comfort Control Module (CCM), or at the very least, the wiring harness.
If your Passat has these symptoms, in part or in full, you are almost certainly in for a rough time.
-
- Remote keyfob not working
- No electric windows
- No interior lights
- Funky clicking noises coming from the passenger seat (RHD)
- General strange things going on with your electrics
All of these things are controlled by a box called the Comfort Control Module (CCM) that sits in a box under the passenger floor panel (RHD). This box hold all of the key electronics that control all of the above functions. Unfortunately for us Passat drivers, there is a bloody awful problem with water getting into the foot well of that car, and ruining your fancy control electronics.
If you have, or suspect you have water coming into the car, I would highly recommend you follow this excellent guide to cleaning out the drainage holes by Ewan.
After you have followed this guide, and you have removed the source of the problem, you will need to check all of your wiring, and also your CCM.
So how do you do it? I will try and give you a head start. I wasn’t really prepared for what would be involved in this, and took some photos as a reminder to me… I always forget where all of those screws go.
As it turns out it wasn’t too painful.
Things you will need
-
- A Philips head screwdriver
- A flat head screwdriver
- A soldering iron/cable joining kit
- (Optional) A multi meter
- (Optional) A VAG-COM KKL cable and a registered VAG-COM software
- patience
- A strong arm and a indifference to blood, sweat and tears
- Caffeine. Tea/coffee. Whatever is your poison
EDIT:- I removed the clip connections and soldered them while trying to figure out a different issue. It is much cleaner and I have more faith in this arrangement
Step 1 – removing the panels
The CCM is under the carpet in the passenger foot well. You need to remove a couple of pieces of trim to gain access to this.
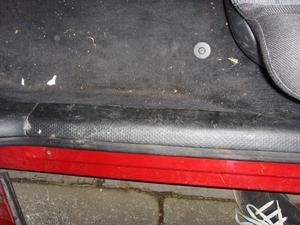
The first thing to remove is the plastic trimming at the front of the door.
First up is the panel on the left of the foot well, in front of the door.
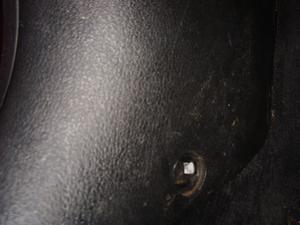
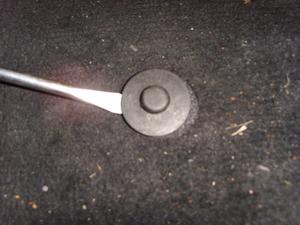
This is held in with one screw and covered by a plastic cap. Use a small blade to pop the cap off, and then remove the screw.
This panel also has some clips onto the chassis, so more brute force is needed.
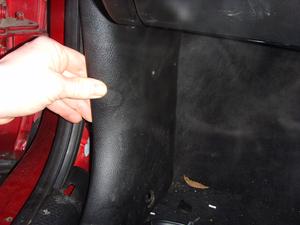
This foot plate is clipped into the chassis, and comes off with a reasonable amount of force. Use a flat headed screwdriver to gently prize it up from the front of the car backwards. I started from the underside of the panel (the floor) and pushed upwards with the screw driver.
This piece of trim runs the whole length of the car, but you should only need to unclip it as far as the seat belt.
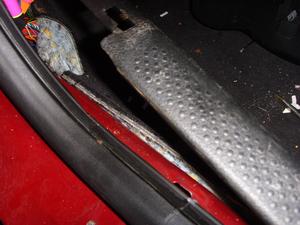
Last in this section is the clip that hold the carpet to the floor. Although there are 2 of these, I found I only needed to remove the one closest to the door.
Step 2 – lift the carpet
The carpet is very thick, and will require a lot of force to lift it up. You will not be able to lift it all the way over to get easy access, as the whole carpet is in one huge piece. Believe me, you don’t want to remove the dash to get it up… it is not worth it.
As you can see from mine, there is rather a lot of water in there. Get a cloth and mop it up. I also ran a fan heater in the car for a few hours to get the wetness out of the carpet. This makes it easier to get though the next bit without getting wet.
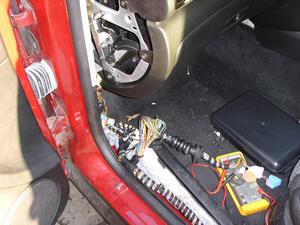
Step 3 – remove the CCM
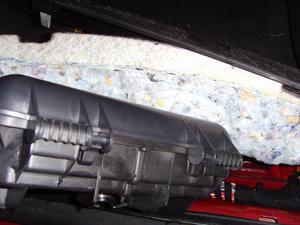
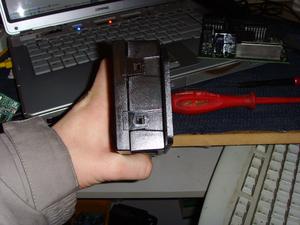
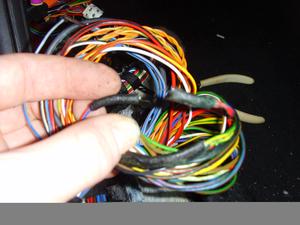
You should see a large black box with a bundle of wires going into it. Put your hand in, and pull the black box out. It is not attached to anything, so it comes out easily enough.
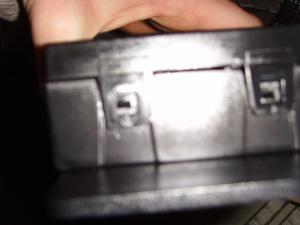
The module is inside of this plastic box. As you can see from the photo, the box has clips on one end. Use your flat headed screwdriver to pop these open. Inside you will see the module. The wires go into two large connectors that are plugged into the CCM.

Remove the CCM from the enclosure by flexing the plastic clips away from the base of the module. be careful not to snap them off. Be gentle.
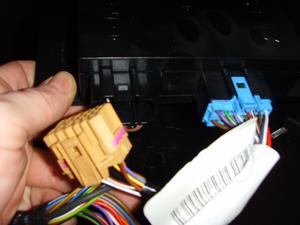
There are push clips at the top and bottom of the connector. Push these and remove the connectors. Slide the rubber seal upwards to remove the harness from the enclosure.
You should now have the harness and box separated.
Step 4 – Clean and dry the CCM
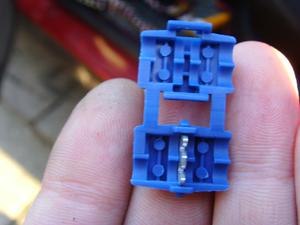
You will need to check the CCM printed circuit board (PCB) for water damage. Removal is similar to the larger enclosure. Use the flat screwdriver to pop open the clips. There are 2 at each end.
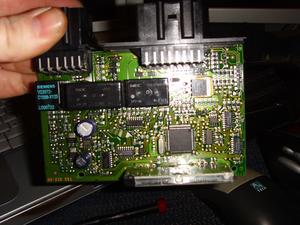
Now you should have your CCM PCB out. Be careful not to touch the sensitive electronics, as this may cause it to never work again.
Look over it for water damage. If your board look really corroded, you may be out of luck. You can replace this with a second user one, but this is beyond the scope of this guide. If you need another one, you will need to get some additional help form the vw forums. You will need a VAG-COM cable, and a license to program your new module. Luckily mine was clean.
Put it somewhere nice and warm for a couple of hours.
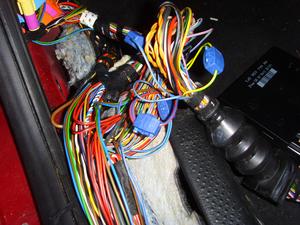
Step 5 – Look over your wiring harness
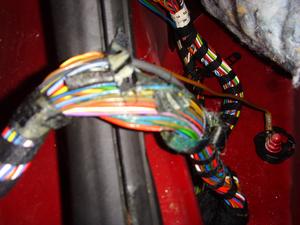
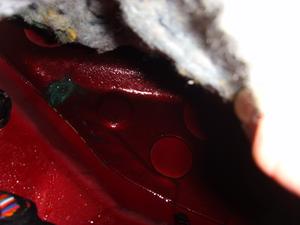
As you can see, my wiring harness was a goner. The water had soaked into the binding, and it had come off in huge sections.
You will see some wires are wrapped in a black tape. This is where they are factory joined to the main harness. This is where they fail. Carefully remove the wrapping from the cable from the twin connectors backwards.
Also make note of the brown ground cable connecting the the chassis, as this can cause trouble too.
Hmm… rusty. This needs sorting out.
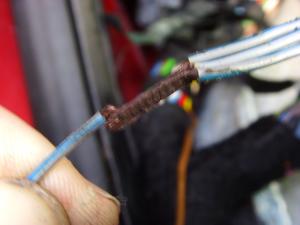
This is much more serious. This cable was in two pieces when I opened up the harness. Most definitely the source of my troubles.
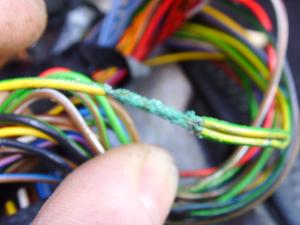
Nice green connectors mean bad news. Another candidate to be replaced.
Step 6 – Replace the corroded connections
You have two options here. Re-solder the bad joints, or use some quick connect snap lock join blocks. These are like terminal blocks but a little more permanent.
I opted for the blocks as my Passat has nearly 100k on the clock, and I can’t see it lasting too much longer. Buy them from Maplin electronics (UK only, sorry the rest of the world!) part code L71AZ. You get ten of these for a couple of quid, so nice and cheap.
I recommend you solder the cables, and using some heat shrink. Make sure to put your heat shrink on first!
Cut the dodgy cable back a little bit to get unrotten cable. Use the snap lock connectors to bridge the bad cables back together.
Using a multimeter make sure you have a nice connection.Repeat for all connectors.
This is how mine looked after I replaced all of the bad connections. Not pretty, but functional.
Now plug in the (dry) CCM and see if it worked. If not keep going with the replacements until it does.
Step 7 – Put her all back together
At this point my camera had run out of juice. Sorry! Anyway, we are nearly done.
Get some good waterproof tape and bind it all back up. I went a little crazy with mine and wrapped it up nice and tight, leaving nothing exposed.
Follow the first part of the guide in reverse, putting the CCM back in it’s enclosure and plugging it all back in. Replace all panels you removed earlier.
Step 8 – Done!
If you have a VAG-COM KKL cable, plug in and test the CCM (they call it the convenience control module). You should see a button for faults. Click this and see what happens. Hopefully you will come back clean.
Give yourself a pat on the back and curse VW for letting such a shitty design flaw get out. Whoever thought that putting the sensitive electronics under the floor panel was a good idea needs a swift kick in the knackers.
Make yourself a nice cup of tea, or have a stiff drink. You deserve it!
Original location:
http://www.headfuzz.co.uk/?q=vw_ccm
This web page was posted at the link above but the website is no longer online and I was unable to track the owner down. I felt this web page was too good to disappear.
Learn more about my Revival project, any questions let me know.